This blog may contain affiliate links. That means if you make a purchase from a link you click on, I might receive a small commission. This does not increase the price you'll pay nor does it decrease the awesomeness of the item. Thanks, Sarah

Thursday, February 16, 2012

Make Your Own Clorox Wide Surface Mop Cover

 Ever since we installed our beautiful laminate flooring I have been struggling with cleaning them.  The broom doesn't pick up all of the dust and it takes at least 3 of the Swiffer pads to clean just the family room.  I would need at least a box a week to clean the whole house and I am not willing to spend over $4 a box every single week.  That is $208 a year on something I would be throwing the the garbage.  So, I planned on making a few reusable covers I saw on pinterest.  

Then one day as I walked toward the baby department in a local discount store (DD's Discount which is a sister store to Ross) I saw this huge Swiffer type mop/duster/broom - it was only $8 and about 4 times the size of the Swiffer.  So, it would take 1/4 of the time to clean the floor and I would have more time to avoid doing dishes - I was sold! 

It is called the Clorox wide surface terry mop and you can buy it at Target for only $10.39 (see it here).  As soon as I got home I cleaned the floors with it and it took no time at all!  

But, covers for it are hard to find online and at Target they are over $6.  I bought the entire thing for $8 and they want me to pay $6 for one cover?  So, I set out to make them and they turned out pretty good!

All you need is:
Kitchen towels (I used microfiber towels I found on clearance at the same store)
Extra wide bias tape (60" for 1 cover)
34" of 1/4" elastic
thread to match
less than 30 minutes of time and a sewing machine

Here is the tutorial:
  Cut the towel into a 19" by 12" rectangle.  Save the extra for dusting or drying really small dishes.
*Next time I make covers I will try to find bigger kitchen towels so they will be at least 19" by 14".*

Round the corners.

Pin the bias tape on one side (with the right side down).

And sew as close to the edge as you can. 

Fold over the bias tape and pin again.

Don't forget to leave an opening to put the elastic through. 

Sew as close to the edge of the bias tape as you can. 

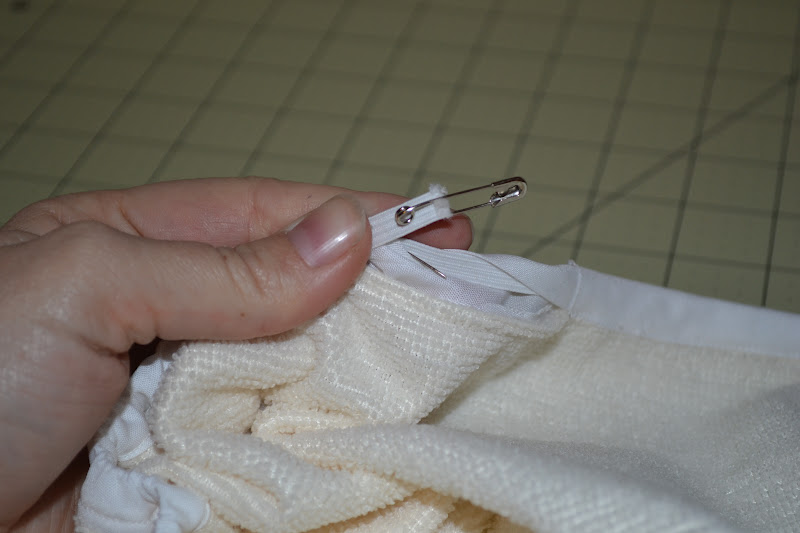
Put a safety pin on the end of your elastic and feed it through the opening. 

Once the elastic is fed through all the way, sew both ends together then sew the opening closed.

Your cover is done!

It fits perfectly!  

I love having a few extra covers because when I use them they get really dirty and it is nice just switching the cover instead of waiting to wash the original cover. 

Cost of Covers:
I bought a package of 4 towels for $3, I had the bias tape, the thread and the elastic. Which makes my cost 75cents per cover!  That is a $197 savings from using Swiffer pads over a year ($208 - $8 mop - $3 covers) !  You might not have the bias tape or the elastic so if you had to buy them it would be $2 at Walmart for each making it $1.75 per cover - still impressive!

Now, if you excuse me I need to go buy this pair of boots I have been drooling over since I saved so much money on disposable covers!  Kidding - that won't be saving anything if I just spent it on something else.  I will continue to drool ...

Have a great day and let me know if you give these covers a try!    

Wednesday, February 15, 2012

Wordless Wednesday: Puppy Love

This is how Midnight (small dog under the blanket) and Chance (dog using her as a pillow) slept the other night.  They are so spoiled and adorable!

Monday, February 13, 2012

Hunk of Meat Monday - 2 Meals from 1 Slow Cooked Roast

As a busy mom, I LOVE my slow cooker. I actually developed a love for it while in college because it is so easy and simple to use. Today I am such a fan of the slow cooker that I have 3 of them. Small, medium and large. My medium slow cooker is over 10 years old and is a base model version. It is the hardest to clean since the ceramic part does not remove for cleaning, but it is my favorite and works like a champ! If you have yet to develop a fondness for the slow cooker, take the time to try something out. It is so easy to do that you are sure to become hooked!

An additional benefit to using the slow cooker is that is uses very little energy and will not heat up your house in the way that an oven will. So it is great to use for hearty meals in the winter but also for summer meals that won't warm up your house and can save you money too.

One of my favorite uses of the slow cooker it to make one crock pot roast into two meals. This is what I do:

Meal 1
* 3-5 lb roast. The type of roast you use probably depends on what you have in the freezer, and how lean you prefer your beef. If you want something lean select a roast from the round such as a london broil or bottom round roast. When using a lean cut expect to add more liquid to the slow cooker. But if you prefer the flavor of something with more fat, select a chuck roast.
* Seasonings - I have a roast seasoning that our local butcher shop sells. The local butcher is a great source for great rubs and marinaded!
* Onions if you like them
* Carrots, Potatoes, even Turnips can used
* Worcestershire sauce and or broth

Remove the roast from the packaging and generously season it before placing it in the slow cooker. Layer on onions if you like and additional vegetables if you like. Add a splash or two of Worcestershire sauce and, if you are using a lean roast, add a cup or so of broth.

 *horrible photo of the seasoned roast. I will have to use the blue crock pot for photos next time.

Set on low or cook - depending on why type of slow cooker you have - and leave it alone for 8 to 10 hours. I prepare this the night before, refrigerate it overnight and turn it on to cook when I leave in the morning.

8-10 hours later your house will smell amazing and dinner will be practically done. Simply take the roast out (carefully as it will be hot and the roast falling apart) and slice it. Serve it pot roast style with carrots and potatoes if desired and a green salad or green beans.

Meal 2
As long as you planned on cooking a large enough roast that you have nearly half of it left over, you can turn the leftovers into BBQ beef sandwiches the next night. If you don't have enough left for a meal - make BBQ sandwiches for lunch.
* leftover roast - shredded by hand or with a fork.
* onions - again optional but we slice and cook our onions down to bring out their sweet flavor and serve them in the sandwich
* BBQ sauce - home-made or store bought, whatever works for you
* Condiments - ketchup, mustard and possibly mayo
* Buns or Dinner rolls

Warm up the shredded beef on low to low-medium heat. Stir the meat often to allow for even warming. Add BBQ sauce. I like to add a bit of Worcestershire sauce and some mustard too. You may also need to add a bit of water depending on how you like your sauce. Allow it to simmer on low for a few minutes while you toast the buns. Spoon the warm beef and BBQ sauce over the toasted buns. If desired add the onions and cheese.

We serve the BBQ sandwiches with sweet potato fries.

Two days of easy delicious meals!

You can use a pork roast if you prefer but will need to add more liquid. Most pork roasts are pretty lean. A great liquid to add is apple or pineapple juice if you have them, both are great compliments to pork.

Hunk of Meat Mondays

Friday, February 10, 2012

Camo Hearts ...

 Michael is a hunter and his camo of choice is Advantage Max 4-D.  I have search high and low for fabric and what I have found is incredibly expensive.  So, when we got new dog beds I kept the old bed since they had Michael's camo on one side.  I didn't know what I was going to use it for but, I knew I needed to save it. 
    
He gets up super early and stands out in the cold to hunt, so I thought I would make some hand warmers that he could heat up quickly before he left and stick in his pocket to keep his hands warm.  

 So, I cut out 4 hearts from the dog bed camo - it is a thick material which is perfect for this project.  I sewed each pair together (leaving a hole for turning and filling.  Filled them with rice and sewed them up.  I wanted the seam to be extra strong, so I stitched around the entire heart.  I like the rustic detailing that extra step gives. 
 And now he has hand warmers to keep his hands warm!  

He had no idea why I chose to make them a heart.  They fit perfectly in his hands and I love him. 

I was going to save them and give them to him on Valentine's Day but then he wouldn't get to use them until next duck season, so I gave them to him as soon as I finished a few weeks ago.  A little tip from Michael - if you put them on your dash over the defrost vent they will stay nice and toasty for when you get to your hunting spot.  I know what you are thinking - he's smart and studly!  I know! 

Happy Friday!  Hope you have an amazing weekend!

Wednesday, February 8, 2012

Wordless Wednesday: Last hunting of the season

 It was the last weekend of duck hunting a few weekends ago so I went along with the boys to try to sneek on some ducks and geese.  They didn't get any birds but I did get some good pictures.   


Then, we went back to the ranch and played home run derby. 

Monday, February 6, 2012

Duck Sliders

As you know, that handsome man of mine is a (duck) hunter.  So, when we had one of his hunting partners over for dinner he had to make something with duck.  Enter sliders ... here is how he made them.

 Defrost  2 pounds of ground beef and 1 package of duck breasts. 

Rinse and dry the duck breasts.

 Slice. 

 Just to be safe feel each slice for shot.  He didn't find any but it is better to be safe.

 Grind the duck breasts. 

 Add the ground beef. 

Mix.
Add a top secret mix of spices. 

 Form into patties. 

Grill.  

We sliced potato dinner rolls for the buns.  

 Cracker cut cheese is the perfect size for sliders. 

 Toppings - tomato slices, avocado, onion, and lettuce. 

 Assemble and enjoy.

They were amazing!!  Perfect size and SO GOOD!

Thursday, February 2, 2012

Flat Aggie Visits a Lamb and Chicken Ranch

Earlier this week I got this in my inbox:

Dear friends,
Greetings from Chico, California!  Last week I made a visit to the Wookey Ranch where Richard and Baji Coon raise grass-fed lambs and chickens.  They graze their sheep all year on the natural grasses that grow on their ranch and surrounding acres.
During my visit, Baji asked me to help her sort out some of the sheep from the main flock. Twenty of the ewes (that’s the name for a female sheep) were close to lambing and they needed to be separated out of the 150 sheep that make up the main flock so she could give them special care.
First we brought the sheep up from the pasture to the working corral. Then we moved them into the sorting chute where we checked ear tag numbers and looked at the udders of the mothers-to-be.  When we saw a ewe from our list, we marked her rump with a special paint.
Then we opened or closed some small gates to let the ewes out of the chute one at a time. The main flock went through the south gate and back out to the pasture. The soon-to-be mamas went out the north gate and into a different pasture where Baji could keep a closer watch on them.  A few days later, the first lambs of the year were born!
Spray-painting the sheep was pretty fun, but the best part of my visit was getting to meet a baby lamb. The lamb in this picture is only 1 day old! 

I had a lot of fun helping at the Wookey Ranch.
Hope you are having fun adventures too!
Love,
Flat Aggie

Thank You Baji and Richard for helping our class learn about agriculture and for taking Flat Aggie on her adventures!  Baji and Richard are amazing people and I am so glad they were willing to be a part of this!  Please check out Wookey Ranch's Local Harvest page here

Linkwithin