This blog may contain affiliate links. That means if you make a purchase from a link you click on, I might receive a small commission. This does not increase the price you'll pay nor does it decrease the awesomeness of the item. Thanks, Sarah

Thursday, November 10, 2011

Ag Unit: Cotton Mind Map

The next part of our ag unit is the cotton mind map.  At this point we already knew what a cotton plant looks like thanks to our cotton pictorial.  So, now we got to extend our knowledge by learning some very specific things about cotton.  The picture in the middle is the same picture from the observation walk we did the first day of the unit. 

I placed each picture on (with masking tape) and labeled it ,one at a time.  We started with the description - this was review from the cotton pictorial we had done the day before.


But, instead of just reviewing the parts of the plant, we used the cotton samples to take a really close look at each part.
They got to touch each part and feel it - some of them even smelled it. 

Then we talked about what a plant needs in their habitat - soil, water, and sunlight.  For next year, I will add a picture of the cotton belt to this section.   
There are many uses for cotton!  It was fun to talk about all the things we use cotton for.  First graders don't think about what their shirt is made out of or what farm animals eat - so, it was nice to explain a few of the things that cotton is made into. 


Then we talked about interesting facts.  These facts came from Cotton's Journey and from online. They love that a cotton bale weighs 500 pounds and talk about it all the time!

I loved doing this mind map because the kids kept going back to it in their writing and we got a lot of mileage from it.  It was time consuming to find all of the pictures online, print them, laminate them and cut them out.  But, it was time well spent! 

What do you think?  Did I miss anything in the mind map (like a square in the description)?  How would you use this in your classroom?

Monday, November 7, 2011

Hunk of Meat Monday: Roast Duck

Duck season started a few weekends ago, which means two things; 1) Michael will be gone every weekend until duck season is over and 2) Our freezer will be full of ducks in no time.  Since we still have a few ducks from last year I thought I would experiment and roast a duck. So, here goes. 

I read online that ducks need to be cooked slow and low . . . but I also read that they need to be cooked fast and high. I decided to go with slow and slow (since I read that advice first and it was in the oven when I read the other advice - lol).  Ducks are very fatty, so you need to pierce the skin all over the bird so the fat will run off.  Honestly, this was the most difficult part of the whole process - I had to sharpen my knife then I sliced slits all over the bird. 
Then just salt and pepper. 

Put it on a roasting pan (you want the fat to drip off).

I cooked it at 350 for 3 hours.  After each hour take it out and poke holes where the fat is not dripping off. 

And it is done!

Michael sliced it up for us.

I was really worried that the duck was going to be gross or I was going to mess it up, so I made some heavy sides to go with it - rice, garlic mashed potatoes, and sourdough bread. 

We had my mom over for dinner and the duck WAS GOOD!  I was so impressed!!  It was pretty easy to make (the cutting was the hardest part and that wasn't hard at all), but takes a long time - I had to leave work right after the kids left so I could start dinner.  It was good too - Michael and mom liked it too!

How do you cook duck?


Hunk of Meat Mondays

Sunday, November 6, 2011

Personalized Bib Tutorial

 There seem to be babies popping out everywhere!  There are 4 women at work that are preggers and Michael's cousin is also preggers.  That means lots and lots of baby gifts! 

I wanted to make them all something that they would love but would also be useful.  I decided upon a few bibs (and other things I will post later) and I thought it would be cute to personalize them, so here you have a personalized bib tutorial. 

You will need:
- fabric for front (1/3 of a yard will made 3 bibs)
- fabric for back (1/3 of a yard)
- thread
- snap
- less than 1 hour
- bib to trace

First, trace half a bib on the inside of a grocery bag.  I used an over sized bib my sister had while my nephew was here.  Then add a seam allowance - it doesn't have to be exact. 
Cut the template out and place on the fold of your fabric of choice. (I know it looks weird, but trust me - I could get three out of this little piece of fabric by slanting the first bib).

Trace with a pen and cut out.

Repeat with a different fabric for the back.

Put the right sides together and pin all the way around.

Sew.  Leave an opening to turn.

Here it is - see my opening?  Now, turn it so the right side is now out through the little opening. 

Now fold the opening closed and pin (if you want or just hold it closed) and iron. 

Then do a top stitch all the way around. 

I used brown thread and I love the way it turned out!

Then add a snap - just follow the directions on the package of snaps.  I think I will try a pearl snap next time. 

The bib is complete and looks great as it is now, but I wanted to make it more personalized, so I picked a font and a fabric so I could add the baby's initial.  I used an iron on adhesive - just follow the directions on the package.  I put the adhesive on the scrap then cut the letter out after the adhesive was attached (you probably already do this but last time I ruined my ironing board cover, so I only cut the shape out once).

Then decide where you want the initial (or shape - I made one with a seahorse too).

And iron it on!  You are all finished!


You can play around with the fabrics and the personalization to fit the baby and the mommy (or daddy).  Or you can make some basic bibs to keep on hand as gifts when you need them. 

Enjoy!

Saturday, November 5, 2011

Ag Unit: Cotton Pictorial

The second day of our unit we drew a cotton pictorial.  My amazing partner traced an enlarged version of the cotton plant from Cotton's Journey. 
It was traced in light pencil and I went over it with markers while the kids watched.  We talked about each part and what each part does then labeled each part.  A few weeks later we added the real boll to our pictorial - just for fun!

This was their very first introduction to cotton!  This took us about 30 minutes to complete. 

Just a note for the teachers ready - we also said the chants the day we did this pictorial (and every day of our unit). 

Friday, November 4, 2011

Ag Unit: Chants

Here are the chants I taught my kids during our ag unit.  I wrote the Ag Here, There Chant and the Farming Sound Off.  The Farmyward Bugaloo was written by someone else - I found it online in a GLAD unit. 


The chants were all up in the classroom for the whole unit - we started with the Ag Here, There chant the first day of the unit and said it every day for a week, then processed it (added pictures to clarify the meaning of difficult words).  We followed the same process for the rest of the chants.

I found the pictures from google images. 


As you can see I underlined the words and made an arrow to the picture - the (AMAZING) teacher I was doing this unit with did not underline or draw arrows, she just put the pictures on whch was probably the better idea - her chants look a lot neater than mine. 


We also sang Farmer Grows A Rainbow - it is really long - way too long to write out on chart paper.  It is a really cute song and I should spend more time singing it. 

So, that is it for now - stay tuned for the rest of our ag unit!  What do you think so far?

Wednesday, November 2, 2011

Wordless Wednesday - Halloween

Over the weekend we had a Halloween party . . . I was Olive Oyl and Michael was Popeye.  I made the costumes.  Mince was less than $2 and Michael was $3 (and all we bought was the hat).


Tuesday, November 1, 2011

Ag Unit: Observation Walk

The first day of our ag unit was spend doing an observation walk.  An observation walk is when the students walk (with a partner) around and look at different sets of pictures (or objects) and write down what they observe. 

I had 6 sets of pictures and I made each set a group of pictures about food, farming (farmers and equipment), fiber, forestry, and flowers.  I found all of the pictures on google - I LOVE google images! 

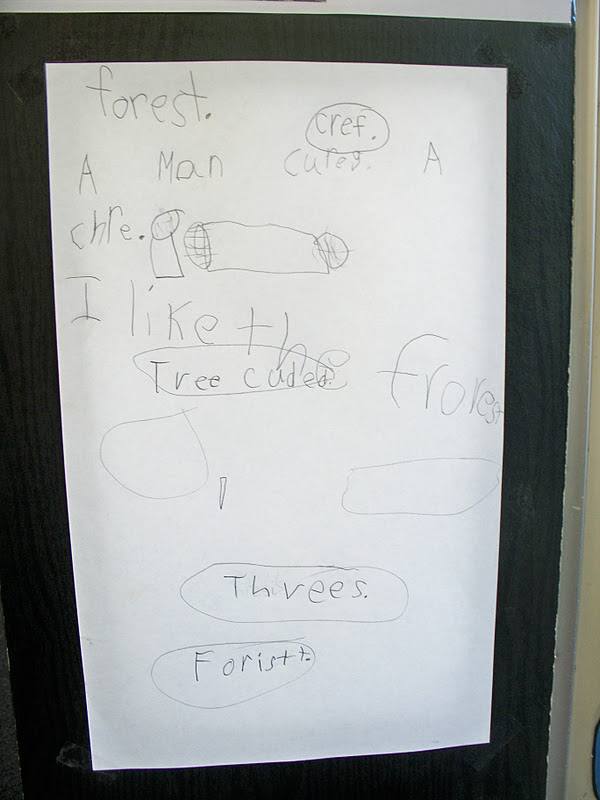
Above are the pictures and below are the observations.  Please keep in mine these are beginning first graders, so you may not be able to read what they wrote - I will translate for you!

Forest, a man cutting a tree, I like the forest, tree cut(ed), trees, forest.

They only drew on the flowers observation chart.

vegetable, foods, we go to the store and buy foods, I see a vegetables, I like vegetable, eating?, I see food, I see lettuce. 

jet, I like the tractor, an airplane.

As I was explaining what to do I accidental said something about the butcher, otherwise their observation would have been a little different.

A butcher gives meat to people, a girl picks flowers, a man is cutting meat. They is a cow and I see a flower is on the left (cut off).

So, there you have it!  This was day 1 on our ag unit!  I will not be going day by day for most of the posts, instead I will be doing a post on each activity we did, this activity just happened to take a day. 

Linkwithin